Mastering The Management Of Raspberry Pi Remotely: The Ultimate Guide
Managing your Raspberry Pi remotely has become a game-changer for tech enthusiasts, hobbyists, and professionals alike. Whether you're tinkering with IoT projects, setting up a home server, or automating your smart home devices, the ability to control your Raspberry Pi from anywhere adds immense convenience and efficiency. But let's be real—getting started can feel overwhelming if you don't know where to begin. In this guide, we’ll break down everything you need to know about remote Raspberry Pi management in simple terms, so you can take full control of your projects without breaking a sweat.
Let's face it—Raspberry Pi is more than just a tiny computer; it’s a powerhouse that can handle almost anything you throw at it. But what happens when you're not physically near your device? That's where remote management comes in. With the right tools and techniques, you can monitor, configure, and troubleshoot your Raspberry Pi from anywhere in the world. Whether you're a beginner or an advanced user, this guide will walk you through the process step by step.
Now, before we dive deep into the nitty-gritty, let’s quickly address why remote management matters. Imagine being able to restart your Pi after a crash while you're on vacation, or accessing your media server from your office without lifting a finger. Sounds pretty awesome, right? Stick around, and we’ll show you exactly how to make it happen.
Read also:Grithmaster The Ultimate Guide To Unlocking Your True Potential
Why Managing Raspberry Pi Remotely Matters
In today’s fast-paced world, flexibility is key. Remote management of Raspberry Pi isn't just a cool feature—it’s a necessity for anyone serious about their projects. Whether you're running a weather station, a home automation system, or even a small business server, being able to access and control your Pi from afar can save you time, effort, and potential headaches.
Here are some reasons why managing Raspberry Pi remotely is a must:
- Convenience: Access your Pi from anywhere without needing physical access.
- Efficiency: Troubleshoot issues faster and keep your projects running smoothly.
- Scalability: Manage multiple Pis simultaneously without being tied down to one location.
- Cost-Effective: Reduce downtime and avoid unnecessary trips to your Pi's location.
Think about it—what if your Raspberry Pi-based security camera goes offline while you're out of town? With remote management, you can log in, diagnose the issue, and get things back up and running in no time. This kind of flexibility is priceless, especially for projects that rely on constant uptime.
Understanding the Basics of Remote Management
Before we jump into the technical stuff, let's cover the basics. Remote management involves connecting to your Raspberry Pi over a network, either locally or via the internet. This allows you to interact with your Pi as if you were sitting right in front of it. Sounds simple enough, right? Well, there are a few things you need to know to make it work seamlessly.
Key Concepts to Grasp
Here are some fundamental concepts you should familiarize yourself with:
- SSH (Secure Shell): A protocol that lets you securely connect to your Pi from another device.
- IP Address: The unique identifier assigned to your Pi on the network.
- Port Forwarding: A technique used to allow external devices to access your Pi over the internet.
- Dynamic DNS (DDNS): A service that maps your changing IP address to a consistent domain name.
Don't worry if some of these terms sound foreign. We'll break them down further as we go along. The important thing is to understand that remote management is all about creating a secure and reliable connection between your Pi and your remote device.
Read also:9xmovies Web Series The Ultimate Guide To Your Favorite Shows
Setting Up SSH for Remote Access
SSH is the bread and butter of remote Raspberry Pi management. It’s a secure way to connect to your Pi from another device, allowing you to execute commands, transfer files, and even control the graphical interface if needed. Setting up SSH is straightforward, but there are a few steps you need to follow to get it up and running.
Step-by-Step Guide to Enabling SSH
Follow these steps to enable SSH on your Raspberry Pi:
- Boot up your Raspberry Pi and log in to the desktop environment.
- Open the Raspberry Pi Configuration tool by typing
sudo raspi-configin the terminal. - Navigate to the "Interfacing Options" menu and select "SSH."
- Choose "Enable" and restart your Pi for the changes to take effect.
Once SSH is enabled, you can connect to your Pi using an SSH client like PuTTY (for Windows) or simply by typing ssh pi@your-pi-ip in the terminal on macOS or Linux.
Securing Your Remote Connection
Security should always be a top priority when managing Raspberry Pi remotely. Leaving your Pi exposed to the internet without proper safeguards can lead to unwanted intrusions and data breaches. Fortunately, there are several measures you can take to ensure your remote connection remains secure.
Tips for Securing Your SSH Connection
Here are some best practices to follow:
- Change the Default Password: Update the default "raspberry" password to something strong and unique.
- Use Key-Based Authentication: Generate an SSH key pair and configure your Pi to accept only key-based logins.
- Disable Root Login: Restrict root access to prevent unauthorized users from gaining administrative privileges.
- Set Up a Firewall: Use tools like UFW (Uncomplicated Firewall) to control incoming and outgoing traffic.
By implementing these security measures, you can significantly reduce the risk of unauthorized access to your Raspberry Pi. Remember, a secure setup is a happy setup!
Accessing Raspberry Pi Remotely Over the Internet
While SSH is great for local network access, what if you want to manage your Pi from outside your home network? That's where port forwarding and dynamic DNS come into play. These tools allow you to create a stable and secure connection to your Pi over the internet, giving you full control no matter where you are.
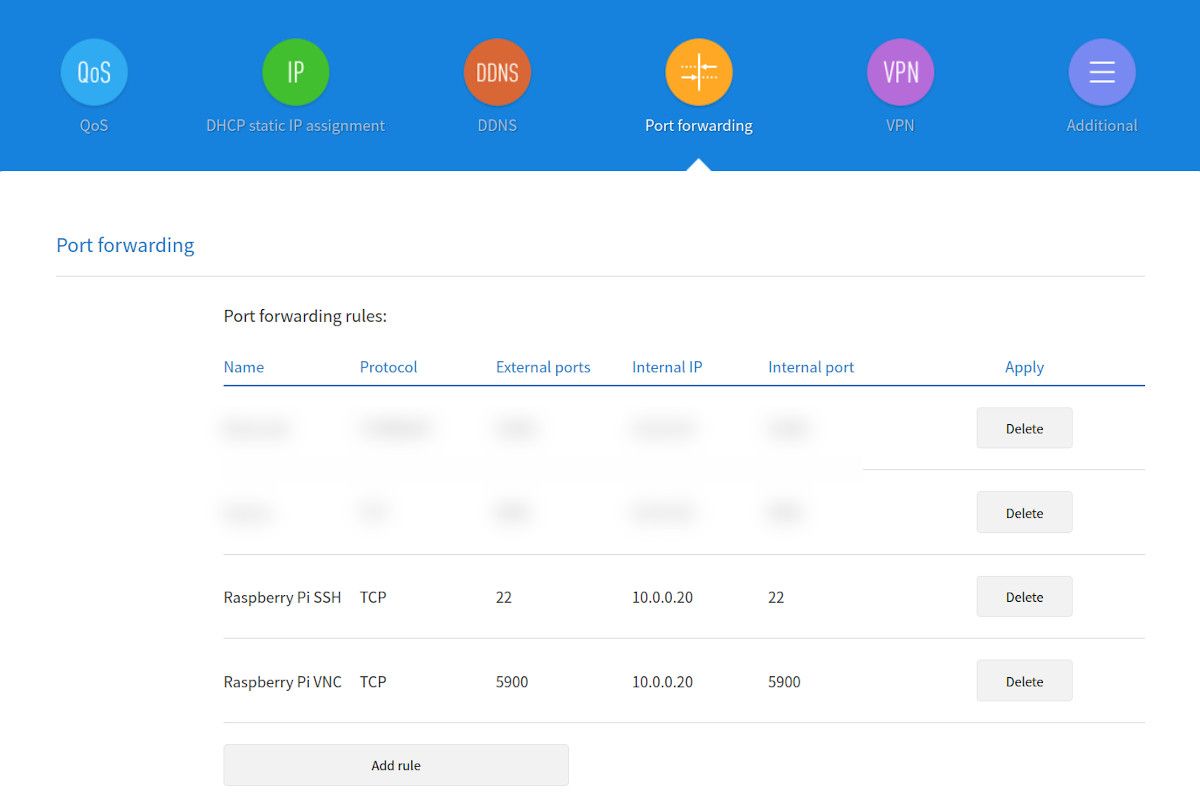
Port Forwarding Made Simple
Port forwarding involves configuring your router to direct incoming traffic on a specific port to your Raspberry Pi. Here's how you can set it up:
- Log in to your router's admin interface using its IP address (usually something like 192.168.0.1).
- Locate the "Port Forwarding" or "Virtual Servers" section in the settings menu.
- Add a new rule, specifying the port number (usually 22 for SSH) and your Pi's local IP address.
- Save the changes and test the connection by accessing your Pi using its external IP address.
Keep in mind that port forwarding can expose your Pi to potential attacks, so make sure to follow the security tips we discussed earlier.
Using Dynamic DNS for Easy Access
Dynamic DNS (DDNS) is a service that maps your changing external IP address to a consistent domain name. This makes it easier to access your Pi without having to remember a complicated IP address. There are several DDNS providers to choose from, such as No-IP and DuckDNS, each offering free and paid plans depending on your needs.
Setting Up DDNS on Your Raspberry Pi
Here's how you can configure DDNS on your Pi:
- Sign up for a DDNS service and create a hostname for your Pi.
- Install the DDNS client on your Pi using the service's instructions.
- Configure the client to update your hostname automatically whenever your IP address changes.
- Test the setup by accessing your Pi using the assigned domain name.
With DDNS in place, you can access your Pi using a user-friendly domain name instead of a constantly changing IP address. It's a small step that makes a big difference in convenience.
Managing Raspberry Pi with VNC for GUI Access
While SSH is great for command-line tasks, sometimes you need full graphical access to your Raspberry Pi. That's where VNC (Virtual Network Computing) comes in. VNC allows you to remotely control your Pi's desktop environment as if you were sitting right in front of it.
Setting Up VNC on Your Raspberry Pi
Here's how you can enable VNC on your Pi:
- Open the Raspberry Pi Configuration tool and navigate to the "Interfacing Options" menu.
- Select "VNC" and choose "Enable."
- Install a VNC client on your remote device and connect to your Pi using its IP address.
Once connected, you'll have full access to your Pi's desktop, complete with drag-and-drop file transfers and real-time interaction. It's like having a second monitor for your projects!
Monitoring and Automating Your Raspberry Pi
Remote management isn't just about accessing your Pi—it's also about keeping an eye on its performance and automating repetitive tasks. By setting up monitoring tools and automation scripts, you can ensure your Pi runs smoothly and efficiently without constant supervision.
Tools for Monitoring Your Raspberry Pi
Here are some popular tools you can use to monitor your Pi:
- htop: A terminal-based system monitor that provides real-time information about CPU, memory, and disk usage.
- Grafana: A powerful visualization tool that can display data from various sensors and services connected to your Pi.
- Prometheus: An open-source monitoring system that can track metrics and trigger alerts based on predefined conditions.
By integrating these tools into your setup, you can gain valuable insights into your Pi's performance and take corrective action before issues arise.
Troubleshooting Common Issues
No matter how well you set up your remote management system, issues can still crop up. Whether it's a failed SSH connection or a sudden drop in performance, knowing how to troubleshoot common problems can save you a lot of frustration.
Common Issues and Solutions
Here are some common issues you might encounter and how to fix them:
- SSH Connection Refused: Check your Pi's IP address, ensure SSH is enabled, and verify your router's port forwarding settings.
- Slow Performance: Monitor resource usage with tools like htop and optimize your Pi's configuration if necessary.
- Lost DDNS Connection: Ensure your DDNS client is running and update your hostname settings if your IP address changes.
By staying proactive and addressing issues as they arise, you can keep your Raspberry Pi running smoothly and avoid unnecessary downtime.
Conclusion: Take Control of Your Raspberry Pi Anywhere
Managing Raspberry Pi remotely opens up a world of possibilities for your projects, whether you're a hobbyist or a professional. By following the steps outlined in this guide, you can set up a secure and reliable remote management system that gives you full control over your Pi from anywhere in the world.
So, what are you waiting for? Dive in, experiment, and take your Raspberry Pi projects to the next level. And don't forget to share your experiences and tips in the comments below. Happy tinkering!
Table of Contents
Why Managing Raspberry Pi Remotely Matters
Understanding the Basics of Remote Management
Setting Up SSH for Remote Access
Securing Your Remote Connection
Accessing Raspberry Pi Remotely Over the Internet
Using Dynamic DNS for Easy Access
Managing Raspberry Pi with VNC for GUI Access
Monitoring and Automating Your Raspberry Pi
Conclusion: Take Control of Your Raspberry Pi Anywhere
